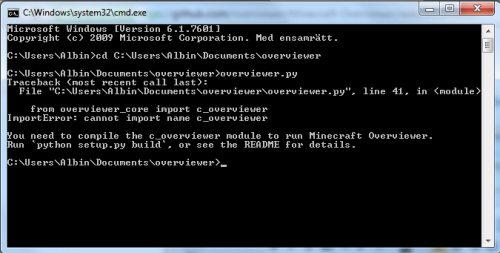
Japp jag har läst readme filen, och "python setup.py build" funkar inte :/
Typ vet du också iallafall, jag kör ju med exe filen så det blir ju just en standar karta.. Standarkarta men så att den startar en viss tid i intervall, så att kartan uppdateras automatiskt? :) ^_^
Readme:
====================
Minecraft Overviewer
====================
By Andrew Brown and contributors (see CONTRIBUTORS.rst).
http://github.com/overviewer/Minecraft-Overviewer
Generates large resolution images of a Minecraft map.
In short, this program reads in Minecraft world files and renders very large
resolution images that can be viewed through a Google Maps interface. It
performs a similar function to the existing Minecraft Cartographer program but
with a slightly different goal in mind: to generate large resolution images
such that one can zoom in and see details.
See some examples here!
http://github.com/overviewer/Minecraft-Ove...ki/Map-examples
Further documentation may be found at
https://github.com/overviewer/Minecraft-Ove...i/Documentation
To contact the developers and other users, go to the site at the top of this
README, or go to #overviewer on irc.freenode.net.
Features
========
* Renders large resolution images of your world, such that you can zoom in and
see details
* Customizable textures! Pulls textures straight from your installed texture
pack!
* Outputs a Google Map powered interface that is memory efficient, both in
generating and viewing.
* Renders efficiently in parallel, using as many simultaneous processes as you
want!
* Utilizes caching to speed up subsequent renderings of your world.
* Throw the output directory up on a web server to share your Minecraft world
with everyone!
Requirements
============
This program requires:
* Python 2.6 or 2.7 <http://python.org/download/>
* PIL (Python Imaging Library) <http://www.pythonware.com/products/pil/>
* Numpy <http://scipy.org/Download>
* Either the Minecraft client installed, or a terrain.png file. See the
`Textures`_ section below.
* A C compiler.
If you download a binary package, then some or all of these may not be required.
Using the Overviewer
====================
For a quick-start guide, see
https://github.com/overviewer/Minecraft-Ove...ick-Start-Guide
Disclaimers
-----------
Before you dive into using this, just be aware that, for large maps, there is a
*lot* of data to parse through and process. If your world is very large, expect
the initial render to take at least an hour, possibly more. (Since Minecraft
maps are practically infinite, the maximum time this could take is also
infinite!)
If you press ctrl-C, it will stop. The next run will pick up where it left off.
Once your initial render is done, subsequent renderings will be MUCH faster due
to all the caching that happens behind the scenes. Just use the same output
directory and it will only update the tiles it needs to.
There are probably some other minor glitches along the way, hopefully they will
be fixed soon. See the `Bugs`_ section below.
Textures
--------
The Overviewer uses actual textures to render your world. However, I don't
include textures in the package. You will need to do one of two things before
you can use the Overviewer:
* Make sure the Minecraft client is installed. The Overviewer will find the
installed minecraft.jar and extract the textures from it.
* Install a texture file yourself. This file is called "terrain.png" and is
normally found in your minecraft.jar file (not "Minecraft.jar", the launcher,
but rather the file that's downloaded by the launcher and installed into a
hidden directory). You can also get this file from any of the third party
texture packs out there.
Biome Tinting
-------------
With the Halloween update, biomes were added to Minecraft. In order to get
biome-accurate tinting, the Overviewer can use biome data produced by the
Minecraft Biome Extractor tool. This tool can be downloaded from:
http://www.minecraftforum.net/viewtopic.php?f=25&t=80902
If the "biomes" folder is present in the world directory, then the Overviewer
will use the biome data to tint grass and leaves automatically -- there is no
command line option to turn this feature on. If this folder does not exist,
then the Overviewer will use a static tinting for grass and leaves.
Compiling the C Extension
-------------------------
The C Extension for Overviewer is no longer optional. In addition to
providing a higher quality image compositing function that looks better on
maps with lighting enabled, it now does the bulk of the rendering.
If you downloaded Overviewer as a binary package, this extension will already
be compiled for you.
If you have a C compiler and the Python development libraries set up, you can
compile this extension like this::
python setup.py build
Note that you need the development headers for your version of Python installed,
look for a package named 'python-dev', 'python-devel' or similar. Also, some
Python distributions do not install "Imaging.h" and "ImPlatform.h" properly. If
you get errors complaining about them, you can get them from the PIL source, or
at <http://svn.effbot.org/public/tags/pil-1.1.7/libImaging/>. Just put them in
the same directory as "overviewer.py".
For more detailed instructions, check the wiki:
https://github.com/overviewer/Minecraft-Ove...ld-Instructions
Running
-------
To generate a set of Google Map tiles, use the overviewer.py script like this::
python overviewer.py [OPTIONS] <World # / Name / Path to World> <Output Directory>
The output directory will be created if it doesn't exist. This will generate a
set of image tiles for your world in the directory you choose. When it's done,
you will find an index.html file in the same directory that you can use to view
it.
Options
-------
-h, --help
Shows the list of options and exits
--advanced-help
Display help - including advanced options
-p PROCS, --processes=PROCS
Adding the "-p" option will utilize more cores during processing. This
can speed up rendering quite a bit. The default is set to the same
number of cores in your computer, but you can adjust it.
Example to run 5 worker processes in parallel::
python overviewer.py -p 5 <Path to World> <Output Directory>
-d, --delete
This option changes the mode of execution. No tiles are rendered, and
instead, files are deleted.
*Note*: Currently only the overviewer.dat file is deleted when you run with
this option
--forcerender
Force re-rendering the entire map (or the given regionlist). This
is an easier way to completely re-render without deleting the map.
--regionlist=regionlist
Use this option to specify manually a list of regions to consider for
updating. Without this option, every chunk in every region is checked for
update and if necessary, re-rendered. If this option points to a file
containing, 1 per line, the path to a region data file, then only those
in the list will be considered for update.
It's up to you to build such a list. On Linux or Mac, try using the "find"
command. You could, for example, output all region files that are older than
a certain date. Or perhaps you can incrementally update your map by passing
in a subset of regions each time. It's up to you!
--rendermodes=MODE1[,MODE2,...]
Use this option to specify which render mode to use, such as lighting or
night. Use --list-rendermodes to get a list of available rendermodes, and
a short description of each. If you provide more than one mode (separated
by commas), Overviewer will render all of them at once, and provide a
toggle on the resulting map to switch between them.
If for some reason commas do not work for your shell (like if you're using
Powershell on Windows), you can also use a colon ':' or a forward slash '/'
to separate the modes.
--list-rendermodes
List the available render modes, and a short description of each.
--north-direction=NORTH_DIRECTION
Specifies which corner of the screen north will point to.
Valid options are: lower-left, upper-left, upper-right, lower-right.
If you do not specify this option, it will default to whatever direction
the existing map uses. For new maps, it defaults to lower-left for
historical reasons.
--settings=PATH
Use this option to load settings from a file. The format of this file is
given below.
Settings
--------
You can optionally store settings in a file named settings.py (or really,
anything you want). It is a regular python script, so you can use any python
functions or modules you want. To use a settings file, use the --settings
command line option.
For a sample settings file, look at 'sample.settings.py'. Note that this file
is not meant to be used directly, but instead it should be used as a
collection of examples to guide writing your own.
Here's a (possibly incomplete) list of available settings, which are available
in settings.py. Note that you can also set command-line options in a similar
way.
imgformat=FORMAT
Set the output image format used for the tiles. The default is 'png',
but 'jpg' is also supported.
zoom=ZOOM
The Overviewer by default will detect how many zoom levels are required
to show your entire map. This option sets it manually.
*You do not normally need to set this option!*
This is equivalent to setting the dimensions of the highest zoom level. It
does not actually change how the map is rendered, but rather *how much of
the map is rendered.* Setting this option too low *will crop your map.*
(Calling this option "zoom" may be a bit misleading, I know)
To be precise, it sets the width and height of the highest zoom level, in
tiles. A zoom level of z means the highest zoom level of your map will be
2^z by 2^z tiles.
This option map be useful if you have some outlier chunks causing your map
to be too large, or you want to render a smaller portion of your map,
instead of rendering everything.
Remember that each additional zoom level adds 4 times as many tiles as
the last. This can add up fast, zoom level 10 has over a million tiles.
Tiles with no content will not be rendered, but they still take a small
amount of time to process.
web_assets_hook
This option lets you define a function to run after the web assets have
been copied into the output directory, but before any tile rendering takes
place. This is an ideal time to do any custom postprocessing for
markers.js or other web assets.
This function should accept one argument: a QuadtreeGen object.
web_assets_path
This option lets you provide alternative web assets to use when
rendering. The contents of this folder will be copied into the output folder
during render, and will overwrite any default files already copied by
Overviewer. See the web_assets folder included with Overviewer for the
default assets.
textures_path
This is like web_assets_path, but instead it provides an alternative texture
source. Overviewer looks in here for terrain.png and other textures before
it looks anywhere else.
north_direction
Specifies which corner of the screen north will point to.
Valid options are: lower-left, upper-left, upper-right, lower-right.
Viewing the Results
-------------------
Within the output directory you will find two things: an index.html file, and a
directory hierarchy full of images. To view your world, simply open index.html
in a web browser. Internet access is required to load the Google Maps API
files, but you otherwise don't need anything else.
You can throw these files up to a web server to let others view your map. You
do *not* need a Google Maps API key (as was the case with older versions of the
API), so just copying the directory to your web server should suffice. You are,
however, bound by the Google Maps API terms of service.
http://code.google.com/apis/maps/terms.html
Crushing the Output Tiles
-------------------------
Image files taking too much disk space? Try using pngcrush. On Linux and
probably Mac, if you have pngcrush installed, this command will go and crush
all your images in the given destination. This took the total disk usage of the
render for my world from 85M to 67M.
::
find /path/to/destination -name "*.png" -exec pngcrush {} {}.crush \; -exec mv {}.crush {} \;
Or if you prefer a more parallel solution, try something like this::
find /path/to/destination -print0 | xargs -0 -n 1 -P <nr_procs> sh -c 'pngcrush $0 temp.$$ && mv temp.$$ $0'
If you're on Windows, I've gotten word that this command line snippet works
provided pngout is installed and on your path. Note that the % symbols will
need to be doubled up if this is in a batch file.
::
FOR /R c:\path\to\tiles\folder %v IN (*.png) DO pngout %v /y
Bugs
====
This program has bugs. They are mostly minor things, I wouldn't have released a
completely useless program. However, there are a number of things that I want
to fix or improve.
For a current list of issues, visit
http://github.com/overviewer/Minecraft-Overviewer/issues
Feel free to comment on issues, report new issues, and vote on issues that are
important to you, so I can prioritize accordingly.
An incomplete list of things I want to do soon is:
* Improve efficiency
* Some kind of graphical interface.